> ## Documentation Index
> Fetch the complete documentation index at: https://hercules.app/docs/llms.txt
> Use this file to discover all available pages before exploring further.
# Customize Auth Portal
> Configure sign-in methods, email and password access, authentication emails, custom domains, OAuth branding, and more for your Hercules app's Auth Portal.
Customize every aspect of your login experience, from which sign-in methods your users see to branding on the OAuth consent screen.
These features require Hercules Auth 2.0. Apps created before Hercules Auth 2.0 shipped need to
[upgrade](/apps/users-auth/upgrade-to-hercules-auth-2) to use them.
Go to **Branding & SEO → Customize Auth Portal** to customize
* [Login methods](#how-do-i-customize-login-options)
* [Language](#how-do-i-change-the-auth-portal-language)
* [Email and password sign-in](#how-do-i-enable-email-and-password-sign-in)
* [Import email and password users](#how-do-i-import-email-and-password-users)
* [Authentication emails](#how-do-i-customize-authentication-emails)
* [Auth Portal domain](#how-do-i-customize-the-auth-portal’s-domain)
* [OAuth consent screen branding](#how-do-i-customize-oauth-branding)
### How do I customize Auth Portal logo, colors, and appearance?
Go to **Branding** → **Customize Auth Portal**. You customize the Auth Portal's colors, logo, terms and conditions, privacy policy and more. Learn more [here](/apps/branding-seo).
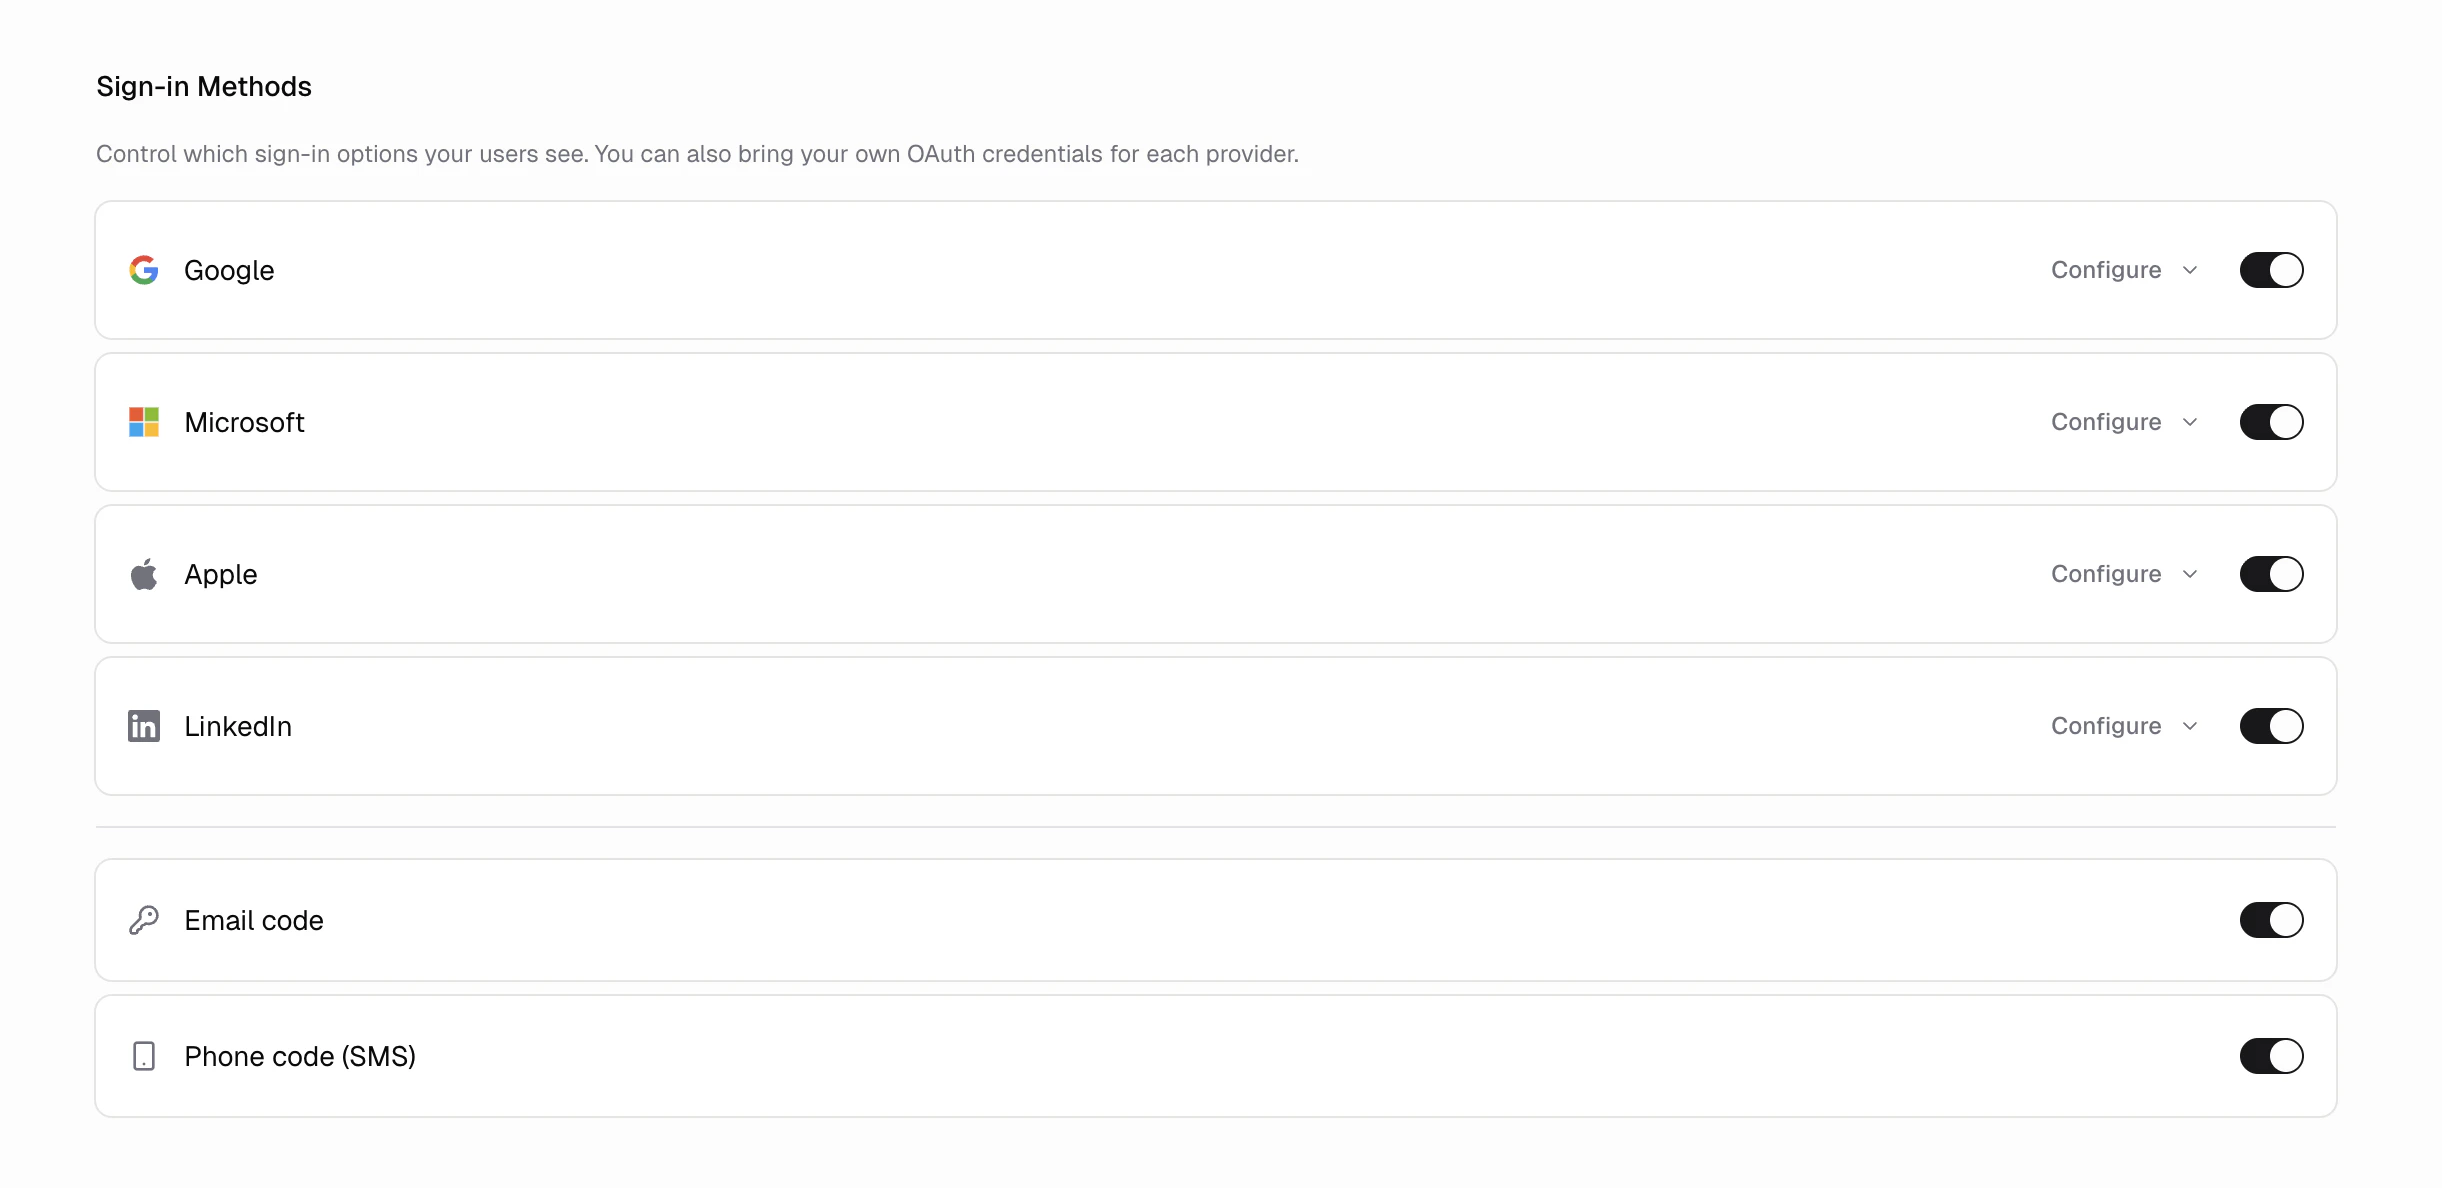
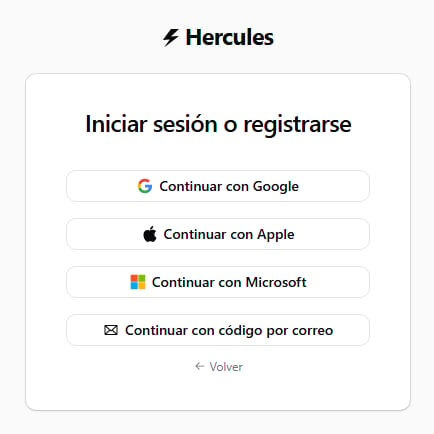
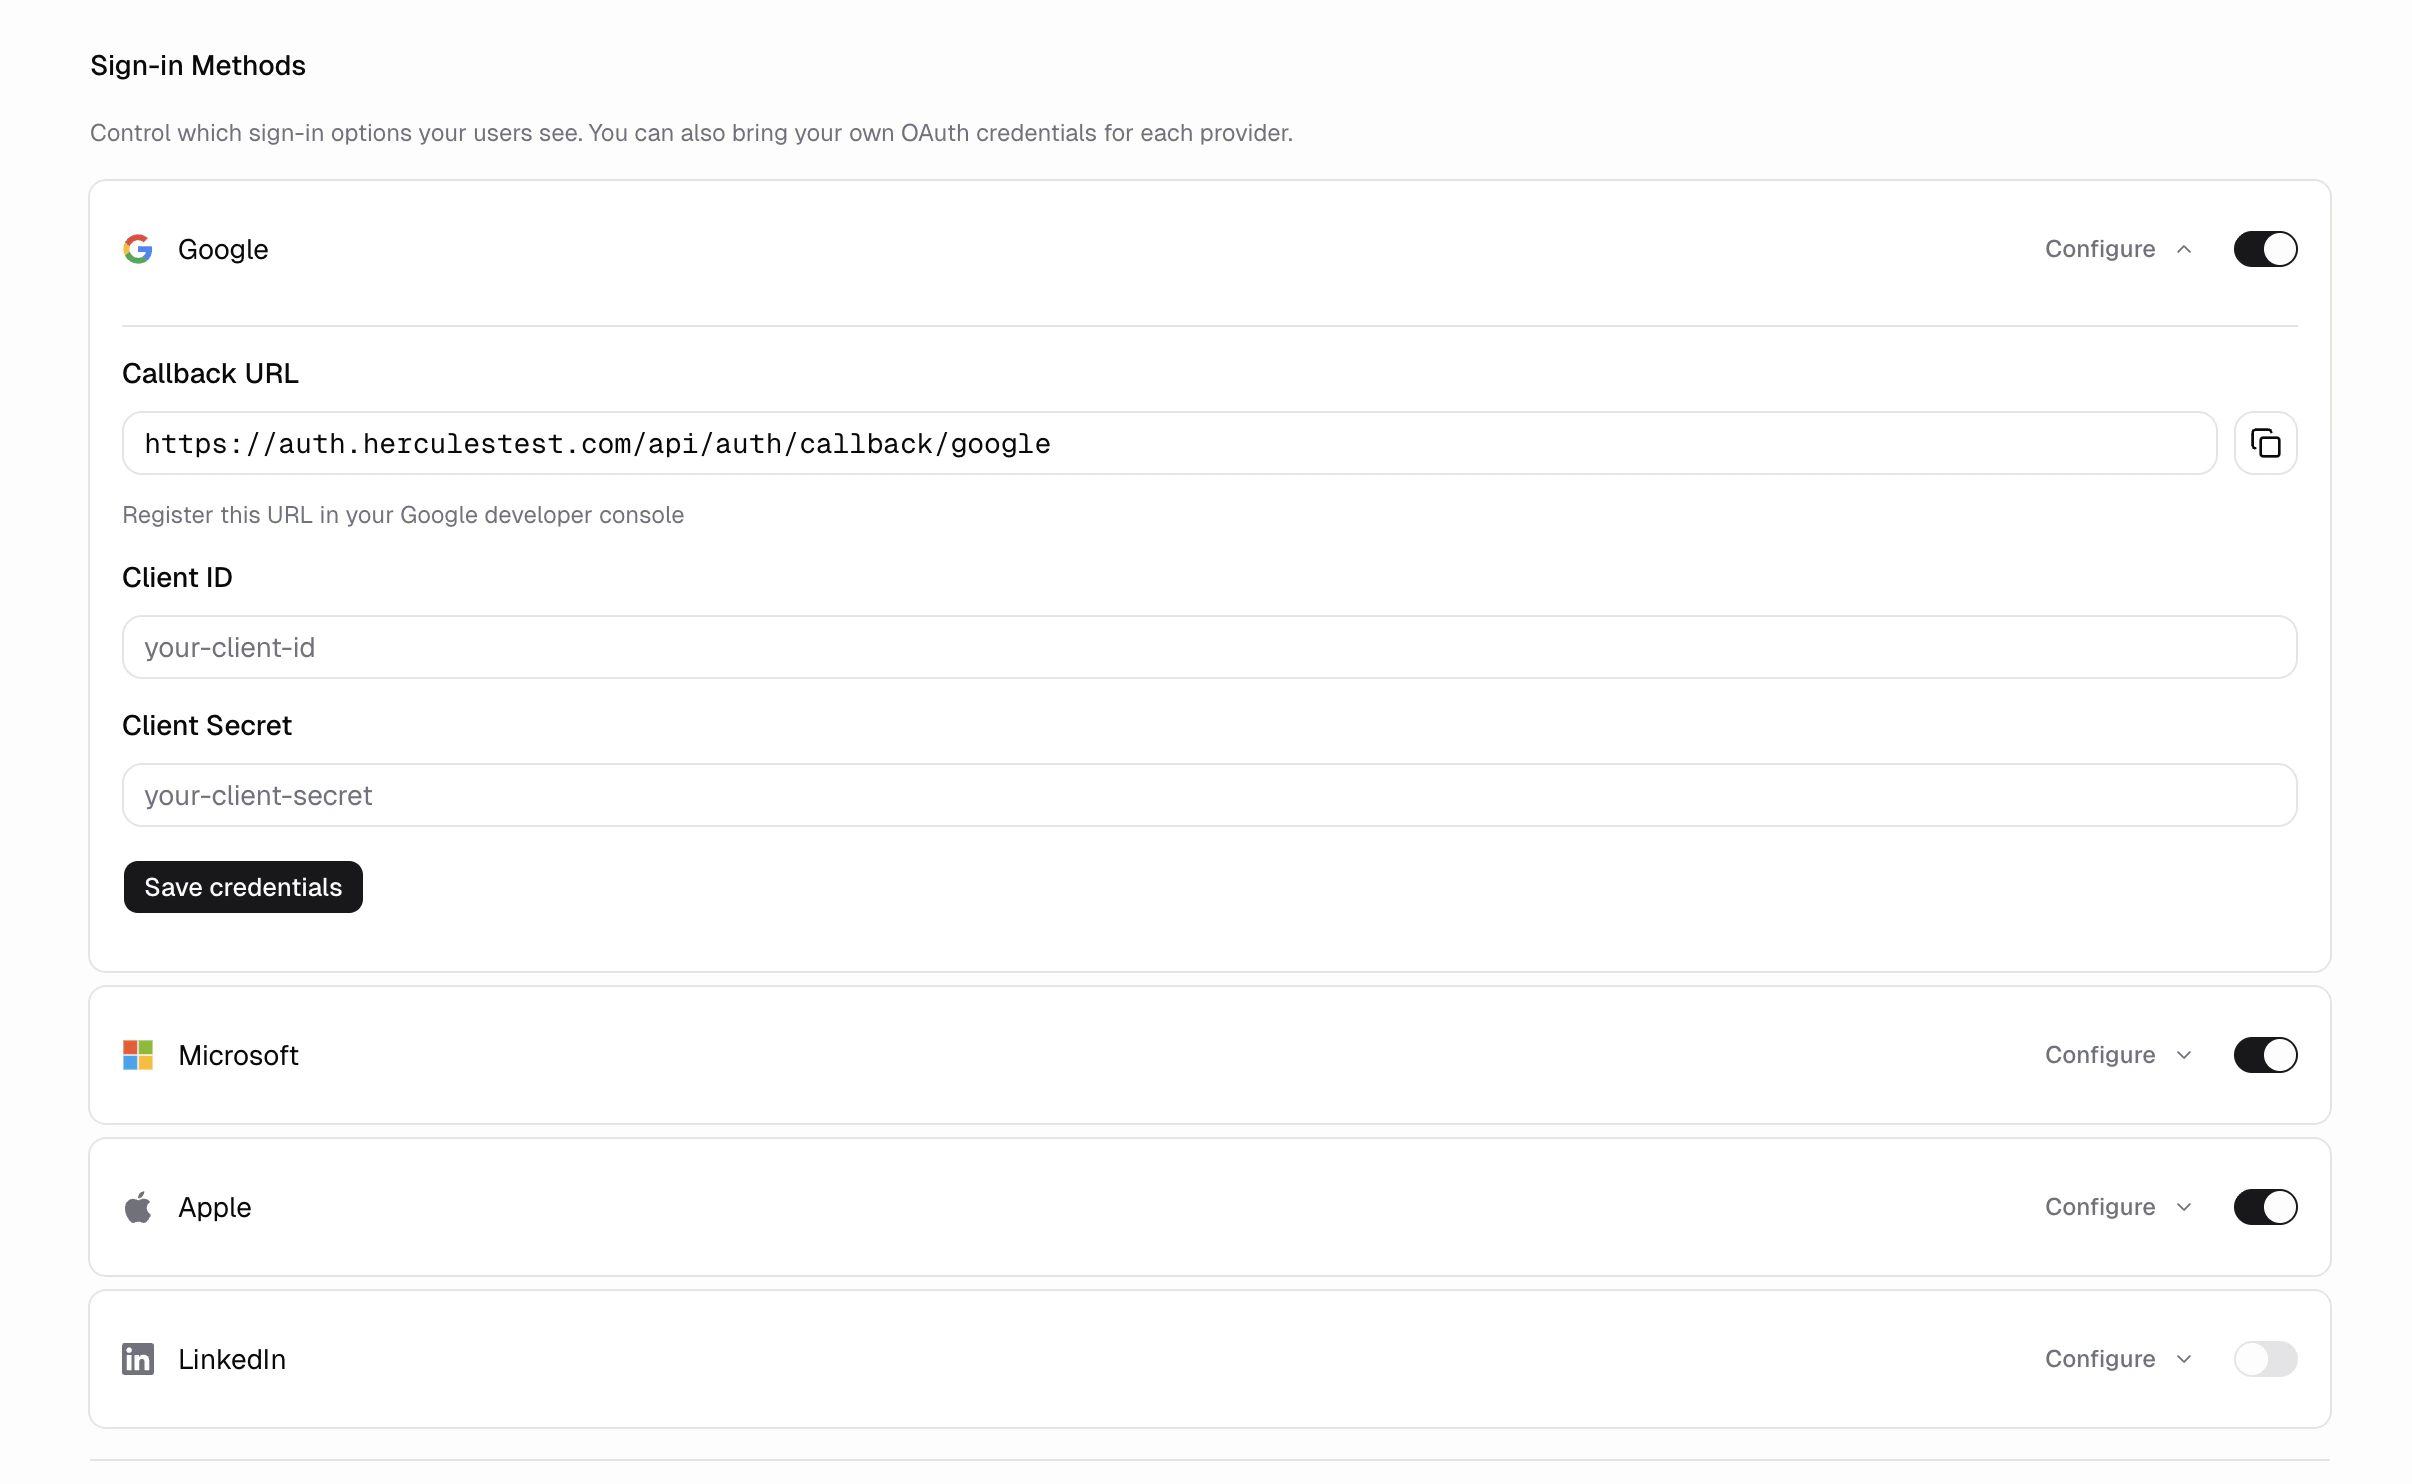
### How do I customize login options?
Go to **Branding** → **Customize Auth Portal** in the sidebar to enable specific login methods for your users
| Method | Default | Description |
| ---------------------- | ------- | --------------------------------------------------- |
| **Google** | On | Sign in with a Google account |
| **Apple** | On | Sign in with an Apple ID |
| **Microsoft** | On | Sign in with a Microsoft account (personal or work) |
| **Email OTP** | On | Sign in with a one-time code sent to email |
| **Email and password** | Off | Create an account and sign in with a password |
| **LinkedIn** | Off | Sign in with a LinkedIn account |
Changes take effect within about a minute. Your users will see the updated options on their next
visit to the Auth Portal.
### How do I change the Auth Portal language?
Go to **Branding & SEO** → **Customize Auth Portal** and choose a language under **Default Language**. The Auth Portal shows sign-in, sign-up, one-time codes, password reset, and account settings in that language for all your users. Hercules supports English, Spanish, French, and German.
Setting a default language is available on Pro, Business, and Enterprise plans.
### How do I enable email and password sign-in?
Email and password sign-in is available on Pro and Business plans.
1. Go to **Branding & SEO** → **Customize Auth Portal**.
2. Under **Sign-in Methods**, turn on **Email and password**.
3. Save your changes.
Your users will see **Continue with email & password** on the Auth Portal.
New users enter their name, email address, and a password between 8 and 128 characters. Hercules
rejects temporary email addresses and passwords found in known data breaches.
Hercules sends new users a verification link that expires after 24 hours. They must verify their
email before signing in.
Users can click **Forgot password?** on the sign-in screen to request a reset link. The link expires
after one hour. Resetting a password signs the user out of their existing sessions.
### How do I import email and password users?
Users on the Business plan can import up to 5,000 users at a time:
1. Enable and save **Email and password** sign-in.
2. Click **Import users** beside the sign-in method.
3. Choose a CSV file and click **Review users**.
4. Review the valid, skipped, and invalid rows.
5. Click **Import users**.
The CSV can be up to 5 MB and must use these columns:
| Column | Required | Description |
| ------------ | -------- | ------------------------------------------------------------- |
| **email** | Yes | A valid email address |
| **password** | Yes | Between 8 and 128 characters |
| **name** | No | The user's name. Hercules uses the email prefix when omitted. |
Do not include other columns. Header names are not case-sensitive.
Imported users are marked as verified and can sign in immediately. Hercules does not send
verification emails or credentials during the import.
Existing accounts and duplicate emails are skipped and never changed. Invalid rows are not
imported. Download the report after review or completion to see the reason for each skipped or
invalid row.
The CSV contains passwords in plain text. Store and share it securely, then delete it after the
import.
### How do I customize the Auth Portal's domain?
By default, the Auth Portal uses a Hercules-managed domain (e.g. `yourapp.hercules-auth.com`). You can change this to `auth.yourdomain.com` so your users see your domain during sign-in. Configuration depends on how you connect your domain to your Hercules app.
| Domain setup | What to do |
| --------------------------------------------------------- | --------------------------------------------------------------------------------------------------------------------------------------------------------------------------------------------------------------------------------- |
| [Purchased through Hercules](/apps/publish/buy-domain) | Nothing. `auth.yourdomain.com` is configured automatically. |
| [3rd party domain](/apps/publish/connect-existing-domain) | After connecting your domain in **Domains**, click **Enable auth portal** on the domain. Hercules creates the auth domain and shows you the DNS records to add: a CNAME on `auth` pointing to the target shown in your dashboard. |
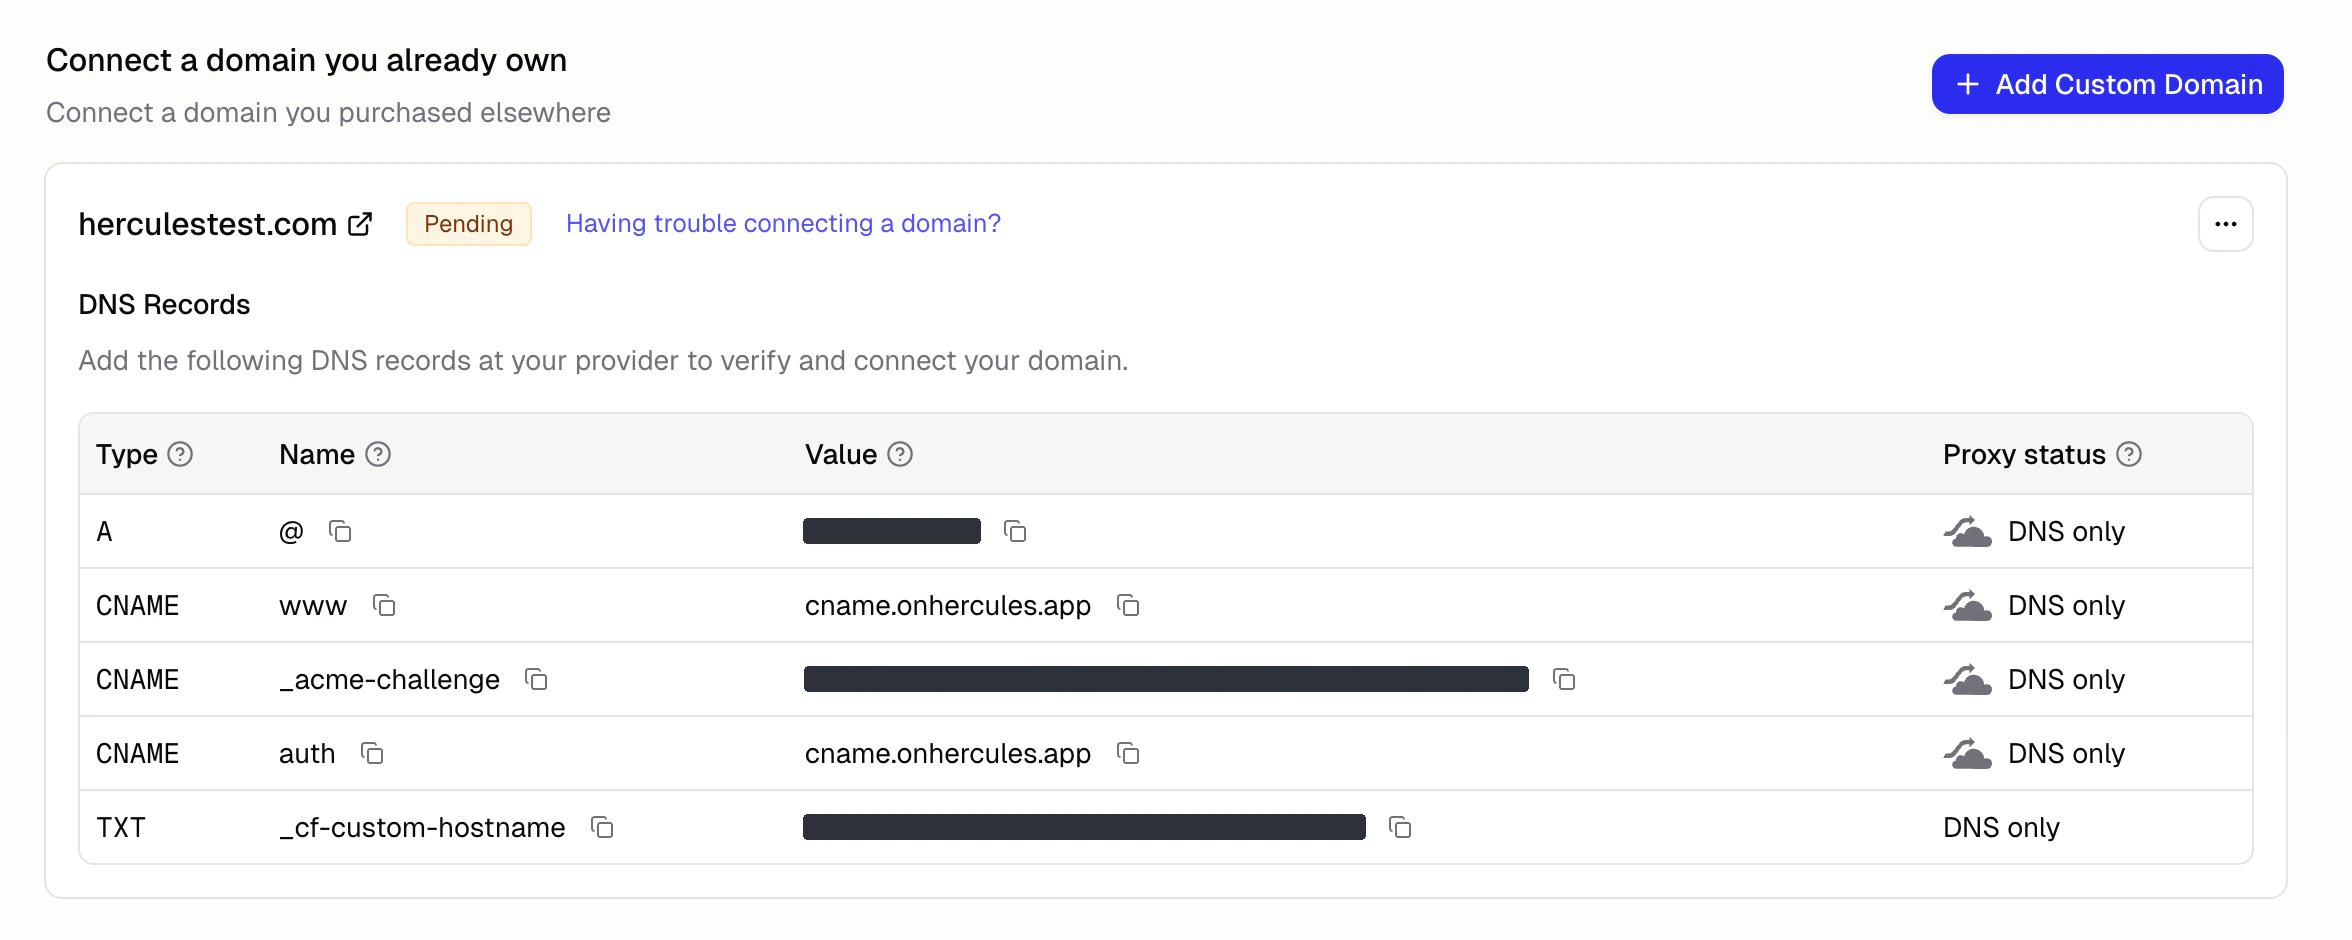
The first connected auth domain activates automatically once DNS is verified. To switch between multiple connected domains, or to revert to the default Hercules domain, use the **Auth Portal Domain** dropdown in **Branding** → **Customize Auth Portal**.
**Additional notes**
1. SSL is provisioned automatically
2. To use a subdomain other than `auth`, contact [hello@hercules.app](mailto:hello@hercules.app)
3. If users see a red "Deceptive site ahead" or "Dangerous site" warning when visiting `auth.yourdomain.com`, the flag typically originates from your apex domain. See [Google Safe Browsing warnings on your domain](/apps/publish/domain-warnings)
### How do I customize authentication emails?
Go to **Branding & SEO** → **Customize Auth Portal** to customize the emails your users receive during authentication:
| Field | Description |
| --------------------------- | -------------------------------------------------------------------------------------------------------------------------------------------------------------------- |
| **Login Code Email Sender** | Sender for login codes, email verification, and password reset messages. Configure a sender identity in [Hercules Email](/apps/emails) first to use your own domain. |
| **From Address** | The local part before `@yourdomain.com` (for example, `noreply` or `auth`). Shown only when you select a domain identity. |
| **Email Subject** | The subject line of the email one-time passcode message. |
| **App Name** | The name used in email content and verification or password reset subject lines. |
| **Email Footer** | A custom signature used in login code, verification, and password reset messages. |
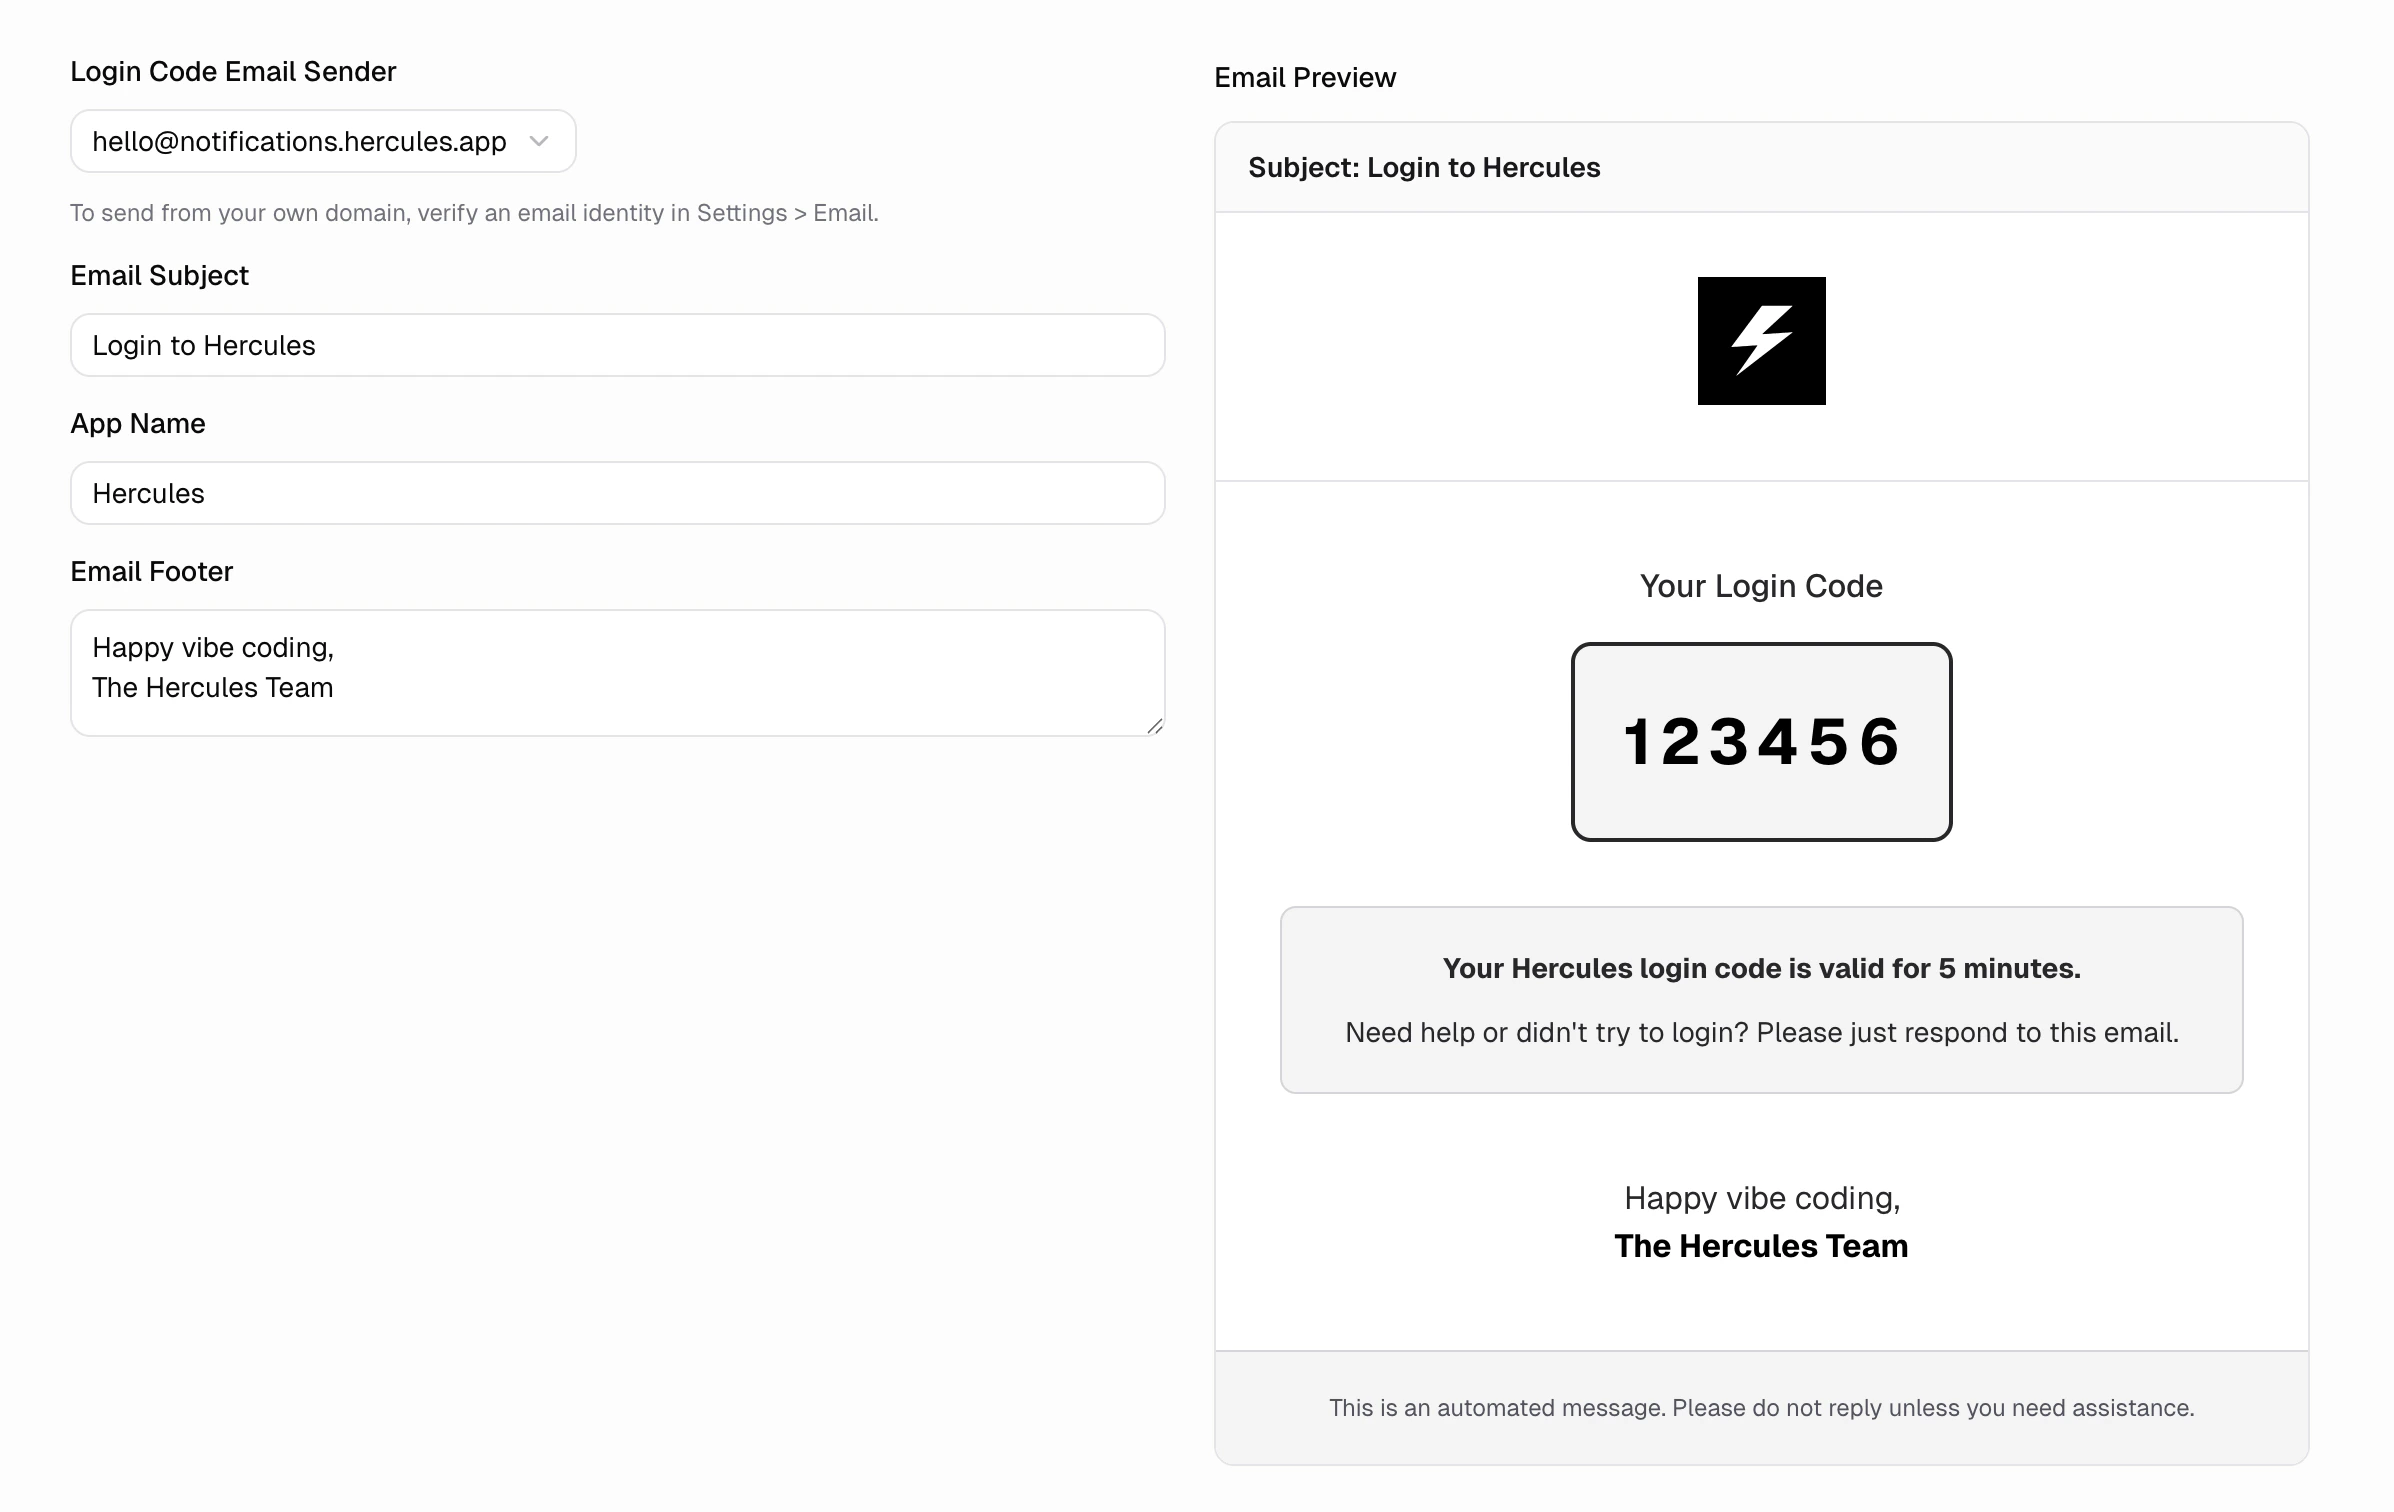
Email customization is available on the **Pro plan** and above.
### How do I customize OAuth branding?
By default, your users see "Hercules" on the OAuth consent screen during social login. Use custom credentials to show your brand name, privacy policy, and terms of service instead.
Go to **Branding & SEO** → **Customize Auth Portal** → **Login Options**, select a provider, and enter your OAuth credentials. After saving, Hercules gives you a **Callback URL** to add to your provider's developer console. See provider-specific guides below.
Go to the [Google Cloud Console](https://console.cloud.google.com/). Create a new project or select an existing one.
Go to **APIs & Services** → **OAuth consent screen**.
* Set the **User Type** to **External** (unless you are restricting to a Google Workspace organization)
* Fill in the **App name**, **User support email**, and **Developer contact email**
* Add your logo, privacy policy URL, and terms of service URL
* Under **Scopes**, add `openid`, `email`, and `profile`
* Save
Google OAuth apps start in "Testing" status with a 100-user limit. To remove this limit, click **Publish App** and complete Google's verification process. This can take several days.
Go to **APIs & Services** → **Credentials** → **Create Credentials** → **OAuth client ID**.
* Set **Application type** to **Web application**
* Under **Authorized redirect URIs**, add the **Callback URL** shown in Hercules (you can come back to this step after saving in Hercules)
* Click **Create**
* Copy the **Client ID** and **Client Secret**
Go to your app's **Auth** settings → **Google** → **Custom Credentials**.
* Paste the **Client ID** and **Client Secret**
* Click **Save**
* Copy the **Callback URL** shown after saving
Go back to the Google Cloud Console → **APIs & Services** → **Credentials** → click your OAuth client.
* Under **Authorized redirect URIs**, add the Callback URL from Hercules
* Save
Go to the [Microsoft Entra admin center](https://entra.microsoft.com/) → **Identity** → **App registrations** → **New registration**.
* Set a **Name** for the app (your users will see this)
* Under **Supported account types**, select **Accounts in any organizational directory and personal Microsoft accounts** (this covers both work and personal accounts)
* Under **Redirect URI**, select **Web** and enter the **Callback URL** shown in Hercules (you can come back to this step after saving in Hercules)
* Click **Register**
In your app registration, go to **Certificates & secrets** → **New client secret**.
* Add a description and choose an expiry period
* Click **Add**
* Copy the **Value** (this is your Client Secret, shown only once)
Copy the secret value immediately. Microsoft only shows it once. If you lose it, you will need to create a new secret.
Go to **Overview** in your app registration. Copy the **Application (client) ID**.
If a user's email already has an account from another method (Google, email code), signing in with a Microsoft work or school account shows "account was signed up using a different method". This clears once Microsoft confirms the user's organization owns the email domain, which it reports through the `xms_edov` claim. Add that claim and these accounts link automatically. (Personal Microsoft accounts verify their own email and are unaffected.)
In your app registration, open **Manifest** and make `optionalClaims.idToken` include `email` and `xms_edov`:
```json optionalClaims in the app manifest wrap theme={}
"optionalClaims": {
"idToken": [
{ "name": "email", "source": null, "essential": false },
{ "name": "xms_edov", "source": null, "essential": false }
]
}
```
Save, then the affected user signs in with **Continue with Microsoft** and links automatically. You do not need to change your supported account types. `xms_edov` is not in the **Token configuration** dropdown, so add it through the Manifest; a "claim not recognized" warning there is safe to ignore.
Go to your app's **Auth** settings → **Microsoft** → **Custom Credentials**.
* Paste the **Client ID** (Application ID from Microsoft) and **Client Secret** (secret value)
* Click **Save**
* If you haven't added the Callback URL yet, copy it now and add it to the **Redirect URIs** in Microsoft Entra
Apple Sign In requires more setup than other providers because Apple uses a private key instead of a simple client secret.
Go to the [Apple Developer portal](https://developer.apple.com/account/resources/identifiers/list) → **Certificates, Identifiers & Profiles** → **Identifiers** → click **+**.
* Select **App IDs** → **Continue**
* Select **App** → **Continue**
* Enter a **Description** and a **Bundle ID** (e.g. `com.yourcompany.yourapp`)
* Under **Capabilities**, check **Sign In with Apple**
* Click **Continue** → **Register**
Go to **Identifiers** → click **+** → select **Services IDs** → **Continue**.
* Enter a **Description** (your users will see this on the Apple consent screen)
* Enter an **Identifier** (e.g. `com.yourcompany.yourapp.auth`)
* Click **Continue** → **Register**
Then click on your new Services ID:
* Check **Sign In with Apple** → click **Configure**
* Under **Domains and Subdomains**, add the domain shown in the Hercules Callback URL (for example, `hercules-auth.com`)
* Under **Return URLs**, add the full **Callback URL** from Hercules
* Click **Save** → **Continue** → **Save**
Go to **Keys** → click **+**.
* Enter a **Key Name**
* Check **Sign In with Apple** → click **Configure**
* Select the **App ID** you created in Step 1
* Click **Save** → **Continue** → **Register**
* **Download** the `.p8` key file. Store it securely. Apple only lets you download it once.
* Note the **Key ID** shown on this page
The `.p8` private key file can only be downloaded once. If you lose it, you must create a new key.
Go to **Membership details** in the Apple Developer portal. Copy your **Team ID** (a 10-character string).
Go to your app's **Auth** settings → **Apple** → **Custom Credentials**.
* **Client ID**: Enter the **Identifier** of your Services ID (from Step 2, e.g. `com.yourcompany.yourapp.auth`)
* **Team ID**: Paste your Team ID
* **Key ID**: Paste the Key ID from Step 3
* **Private Key**: Open the `.p8` file in a text editor and paste the entire contents, including the `-----BEGIN PRIVATE KEY-----` and `-----END PRIVATE KEY-----` lines
* Click **Save**
Go to the [LinkedIn Developer Portal](https://www.linkedin.com/developers/apps) → **Create App**.
* Enter an **App name**, **LinkedIn Page**, and **Logo**
* Accept the terms and click **Create app**
In your app's **Products** tab, find **Sign In with LinkedIn using OpenID Connect** and click **Request access**.
Go to the **Auth** tab.
* Under **Authorized redirect URLs for your app**, add the **Callback URL** from Hercules
* Copy the **Client ID** and **Client Secret**
Go to your app's **Auth** settings → **LinkedIn** → **Custom Credentials**.
* Paste the **Client ID** and **Client Secret**
* Click **Save**
**Additional notes**
* If you remove custom credentials, Hercules automatically falls back to its own managed credentials. Social login continues to work. Your users will see "Hercules" on the consent screen again.
* Custom OAuth credentials are available on the **Business plan**
### Can I bring my own auth provider?
Currently, Hercules apps only support Hercules Auth. Authentication is a fragile part of building software. If auth breaks, your entire app can break. We prioritize making Hercules Auth a stable, well-supported, secure, and robust auth system. We are working on supporting custom auth providers in the future.
### Additional FAQ
Your app likely uses the previous Hercules Auth.
[Upgrade to Hercules Auth 2.0](/apps/users-auth/upgrade-to-hercules-auth-2) to unlock provider
toggles, your own developer accounts, custom auth domain, and email customization.
**Auth** is how your users prove their identity (sign in / sign up). **Users** is where you manage
the people who have signed up for your app, including their roles, permissions, and account
status. Configure auth options here; manage your user base in the [Users, Roles &
Permissions](/apps/users-auth/users-roles-permissions) tab.
Yes. Hercules Auth blocks throwaway and temporary email addresses (like Mailinator, Guerrilla
Mail, etc.) by default for email one-time passcodes and email and password. Social sign-ins are
not blocked by this check.
Split the users across multiple CSV files with no more than 5,000 rows in each file.
Yes. Imported users can use **Forgot password?** immediately.
Yes. The import continues in the background. Open **Import users** again to see its current
status. Each app can run one import at a time.
Accounts created by the first import are skipped and left unchanged. Rows that previously failed
validation can be imported after you fix them.
Not currently. Hercules Auth works by redirecting to a Hercules-hosted Auth Portal. We are working
on allowing in-app authentication flows in the near future.
No. Existing users can sign in with any enabled method that matches their email address. If a user signed up with Google and you later enable Apple, they can sign in with Apple using the same email and both accounts are automatically linked.